by Harry (BigH) Ryalls.
30th May, 2004: Now to the interesting part of the story – THE WET STUFF. Thankfully I was fully recovered by the Sunday and more than ready for the trip to the Dunraven and Ras Mohammed, where we would be diving Shark Reef and Yolanda reef (The Toilet wreck closeby). I had heard enough about the diving from the first days group so was more than ready for the off.
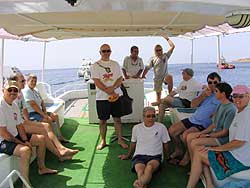
Dive group day 1 (290504)
The daily plan was for the dive shuttle to pick our group up from the resort – 8.00 am on the Saturday and Sunday, 3.30 am on the Wednesday as we were later to find out – then head off to the harbour and our dive boat. All our kit would already be on the boat, loaded by the boat boys, all we had to do was get aboard and make ourselves comfortable. Tea, Coffee, Water and soft drinks (Coke mainly) were supplied within the cost (lunch can also be arranged for an additional 30LE each) you just had to help yourselves. The boat that we were using was called El Hadi, which had a large sundeck, partly covered with a shade if you needed to get out of the sun. There was a large lounge, which was a dry area and no diving suits were allowed, you could prepare your underwater cameras in this area and store your dry kit as well. This was also the area where the meals were laid out for you to help yourself. You could also sit here to eat or you could take your meal back up top to the sundeck and the shade. For lunch we had a good choice of about 5 spice dishes of various sorts with a couple of rice dishes as well.
A bit about our first dive – The Wreck of the Dunraven (27° 42’ 22″ N, 34° 07’ 02″E.)
The Dunraven was built by Mitchell & Company of Newcastle, and was officially described as an “Iron Screw Steamer – Planked”. The ship was launched in December 1873 and was one of those relatively new breed of vessels – capable of being powered by either sail or steam. As a relatively large boat for her day she displaced 1,613 gross tonnes and had a coal fired two-cylinder compound inverted engine – also built in Newcastle, by Messrs Humphrys and Tennant. This engine was capable of producing 140 hp, which gave the ship a top speed of 8 knots unladened. The ship was 79.6m long, 9.8m wide and had a draught of 7.3m. The Dunraven was owned and operated by W. Milburn of London and, after successful sea trials, was used on the Liverpool to Bombay run.
In January 1876, 27-year-old Captain Edward Richards Care watched his ship being loaded for it trip from Liverpool to Bombay. The trip out was to be without incident and by the end of March they were loading for the return leg back to England. On the 6th April 1876, loaded with what was later described as a “valuable general cargo”, the ship left India bound for Liverpool. On the 24th April she continued through the Red Sea, “weather fine and clear, wind light, water smooth, no sail set, vessel proceeding at full speed of 6½ knots.” was recorded in the ship’s log at the time. The Second Mate saw “high land” ahead at around 1am the next morning and took this to be Shadwan Island. Fifty minutes later he then saw what he took to be Ashrafi Light – up in the Straits of Gobal, the Captain was on the Bridge throughout this time and did not question either the sightings or their identification. The Second Mate, although he was later to change this, described the light as a “bright fixed light”. Curiously, although the Captain also saw the light, the man at the ship’s wheel did not see it himself. The Captain went below decks at 2.15am, leaving orders to be called in one hour, at 2.40am the light was said to be “lost to view” – as though it had simply gone out.
Once again the Second Mate’s evidence becomes confusing on this subject, as later when he gives his evidence to the Enquiry, he stated that he called the Captain as soon as he lost sight of the light but later changed this to having called the Captain sometime between 3.30 and 3.40 am – thus admitting he had failed to follow orders. When Captain Care did arrive on deck, land was to seen approximately 6 or 7 miles off the starboard side and in a northerly direction. The time was now 3.40am and he immediately ordered the course to be altered 2 points to starboard and closer to that land. At 3.50am the lookout saw a “large dark object” in the water that he thought to be a buoy and called this out to the Bridge – but got no reply. At same instant, the Second Mate also saw the object but thought it was a boat, and casually reported this to the Captain. Captain Care immediately ordered the engines be stopped but before this could happen the Dunraven struck hard and hit the reef on the South of Beacon Rock light on Sha’ab Mahmud, which immediately penetrated the fore compartment of the ship.
The steam pumps were immediately set to work and a fruitless attempt was made to heave her off by means of a kedge anchor. By 7am, the water had reached the engine room and put out the fires. Captain Care and his crew took to the lifeboats around midday as the starboard side of the upper deck was now under water, where they remained with their doomed vessel. At 4pm an Arab Dhow came alongside and took the shipwrecked mariners on board and it was only at this time that Captain Care became aware of his actual position – just off the southern tip of the Sinai Peninsular. At 5 pm, the Dunraven slipped off the reef and sank in 27m of water to her watery resting place where she is today. For three days the Arab Dhow had to lay at anchor over the wreck site until Captain Care and his crew were transferred to the passing Italian steamer that conveyed them to Suez and later transportation back to England.
The Dunraven now lies almost completely upside down, with her port side resting along an adjacent reef – with a slight “list” towards that reef. At a depth of 17m, with the upside down bows being the shallowest part of the dive, with the stern resting on the seabed at 30m. The leading edge of the bows are broken and slightly separated – with the whole structure leaning backwards and resting close to the reef. There is plenty of coral growth on the upturned hull – although not as prolific as one might expect on a vessel that has been underwater for such a length of time. The wreck has changed greatly over the years since I last dived her and has settled into the sandy seabed, but you can still gain access to the hull near the stern section. This is 30m and the deepest part of the Dive.
On top of the hull, the rudder and propeller are still in place – although one of the four blades is missing this presents a good opportunity for a photo shoot. Here you will find a break in the hull at a point immediately in front of the Engine Room, and just inside the aft section, where you will find one of the ship’s two huge boilers which support the hull at this point and allow it to retain its original shape. This is where the best part of the dive begins, as surrounding the boilers are thousands of Glassfish, a species of tropical fish that always prefer the shade. On entering the hull, they move lazily aside to allow you safe passage. The boilers are side by side and, although they occupy a large amount of space, there is plenty of room for a “single file” diver to pass between the boiler and starboard side. On the other side of the boilers, are all the pipes taps and valves and then the engine itself – with its large connecting rods and pistons all still in place. Above head height is a large gear wheel and even more valves. Sadly some of the breathtaking views are now gone, but there are plenty of other things for you to explore and see.
Overall, the Dunraven provides the diver with a thoroughly enjoyable series of dives on what is, after all, one of Egypt’s most famous shipwrecks.
A bit about our second dive – Ras Mohammed – Shark and Yolanda Reefs (27 43.300’ N / 34 15.000’ E)
Ras Mohammed is the peninsula on the southern tip of the Sinai and is located approximately 25 km Southwest of Sharm El Sheikh. It is unique with its very deep waters heading vertically down from the shore reef top of 1 m. The park is home to a variety of stunning geological underwater features and uplifted coral reefs. Being the first land the water reaches, the currents here are unpredictable and can be VERY strong. This can make for some exciting drift dives for the experienced diver. Two emerging reefs which rise from a sandy seabed some 20-30 meters deep are the most distinctive features of this splendid dive site, set a few hundred meters from the coast, right in line with the easternmost tip of the Hidden Bay, where it is possible to admire a great many species of pelagic fish and with the powerful currents, a chance of encountering sharks.
The dive sites of Shark Reef and Yolanda Reef are two submerged islands on gently seaward sloping sandy coral plateau extending from the reef plate at a depth of 5 metres to the edge of the plateau between the reefs at a depth of 25 metres. They are a very popular dive sites, forcing the National Park to put in a rota system for those that want to dive them, these sites are the most southerly sites possible with very deep water, If you can cope with the summer heat this site is spectacular from mid June to mid August when the fish are mating. Grouping together in large schools out in the deep water. You need an elastic band just to stop your bottom jaw from dropping!! This is the number one and most popular dive site of the Ras Mohammed area and indeed of the Red Sea. Travel time by boat from Na’ama Bay is about 90 minutes.
Shark Reef is clearly the more colourful and spectacular of the two with its sheer wall and abundant marine life both large and small. Yolanda Reef, the larger of the two, is named after the vessel, which sank there in 1980, depositing its cargo of bathroom fixtures and utilities. The Yolanda’s contents are now home to many of the resident population. Although much of the ship has fallen over the drop-off, a quantity of the cargo remains for the amusement of the visiting divers and is of interest to photographers. The two reefs are approximately 40 metres apart. There are two mooring lines on the plateau – one is at a depth of 7 metres between Shark and Yolanda Reef, the second is close to the wreck, just to the south of Yolanda Reef. Shark and Yolanda Reef can be dived from the boat either as a drift dive or as a mooring dive. The Shark and Yolanda Reef dive site is of special interest because of its geographical location at the southernmost tip of the Sinai Peninsula between the Gulf of Aqaba and the Gulf of Suez. When planning a dive here take into careful consideration some of the local factors, which influence this site, current strength and direction, time of day, sunlight direction, as well as depth and time limits.
This dive is for experienced divers only – the current is very unpredictable and has been likened to diving in a huge washing machine. To the south of Yolanda Reef, visibility may be limited during tidal changes. Usually the dive takes the form of a clockwise route starting at the drop-off on Shark Reef (keeping the wall on the right-hand side), crossing the sloping plateau between the two reefs and continuing towards Yolanda to finish at the wreck contents in the south. Marine life ranges from large Napoleon wrasse, turtles, moray eels, snapper and barracuda, to the white tip and grey reef sharks, eagle rays and on occasion, manta rays. Hard and soft corals are in plentiful supply as are large Gorgonian fan corals.
When you have dived this wonderful site, you will understand why it is rated among the best in the world.
A bit about our dive operator- Dive Africa Web / Email

Dive Africa Tank Sticker
Now would be a good time to give some information about our dive operator Dive Africa. As I have said I found them when doing a search on operators that are in Sharm El Sheikh area of the Sinai Peninsula and they promptly replied to my email giving lots of information about what they could offer us as a group. This was to be the first of many emails between Nikki van Veelen, who looks after their operation in this area and myself. Dive Africa is a South African company and is a PADI 5 star IDC resort centre employing a permanent and experienced complement of 10 multi-lingual staff, all of which are English speaking. The languages in which their services are offered are extensive and include Russian, French, Polish, German, Italian, Dutch, Danish, Afrikaans, Spanish, and Arabic, so there should be no problem with communication. The dive centre is situated inside the 4-Star Sharm Holiday Hotel, Sharm Beach Resort and is based within easy walking distance from Na’ama bay – the main tourist area in Sharm El Sheikh. It is also based within walking distance from many of the main hotels in the area. But irrespective of which hotel you stay at they do supply a service to other divers along with a free complimentary daily transfer shuttle to and from the Dive Centre and all hotels that are within the Sharm el Maya bay and the Nabq area. The centre is located between the world’s famous Ras Mohammed Marine Park and the exciting Straits of Tiran, which offer an unsurpassable range of diving.
Dive Africa can also offer an exclusive one stop service for the holidaying diver, which includes the booking and handling of all diving services and hotel accommodation, they will meet and assist at the airport, as well as organise sight-seeing and transfers. They offer fully, well maintained and quality scuba and snorkelling equipment for hire at the Dive Centre and all of their quoted prices include tank, both international as well as Din tank valve fittings, weight belt and weights. They provide that extra special service that makes them stand out from others, your equipment is carried to and from the boat and you do not have to worry about cleaning it as it is wash down after each trip, if you do not want to take it back to your hotel and do it yourself. They cater for the smaller group of divers, ours was 10 divers, and you get that special personal service feeling because of it.
Their dive boats, although they may not look brand new, are very clean and tidy; no one within our group could find anything to complain about. We used two different dive boats for the trips we had planned.
The first called “El Hadi” is a day-boat and is well suited to our needs. The upper deck is a cover sundeck with the stern part open to the elements, as is part of the forward area in front of the main steering position. The lower deck is divided into two areas, the wet area where all diving equipment is stored and the lounge area, which is also the dry area. Here is where you are able to load cameras and prepare them for up and coming dives; you can also store your clothing and personal items within this area as well. If you have opted to make use of the lunch option, you will find that it is laid out within this area and can be eaten or taken to other parts of the boat as you wish. There is one toilet facility on the boat and as with all dive boats you must be wary of what is put down the bowl. Within the bathroom are washing and shower facilities, although no one made use of the latter. Outside in the wet area you were provided with a plastic crate to stow your diving kit and this was then located under the benches, which run down both side of the deck. Each bottle was stored within “cut-out” which although provided very good stability and removes the possibility of you getting a bungee strap around the ear, were a bit too deep and made removal of the bottle difficult for some of our group. If you had attached your BCD to the bottle and attempted to stand up with it on your back, you could easily do some damage to yourself, so you had to remove the set-up before attempting to kit-up fully. At the rear was a wide platform, which made entry into the water very easy, sadly there was “an inverted aerial” style ladder for the exit, so you had to keep you fins on for exit, but the boat boys were there to give a hand if required. You then made your way back to your position and de-kitted, replacing the bottle back in its hole.
Our second boat, called “King Sbefro 4”, was only used for the Wednesday when we visited the Thistlegorm wreck site. This is a live-aboard boat; although we did not find this out till later, with 4 cabins below decks, each with a set of bunk beds length ways along the hull. There are two bathrooms, both with washing and shower facilities, the toilet is of the pump/siphon action. Above the lower deck is the main sitting room, which looked to be a bit small for a full boatload. Forward from here is the kitchen and dining areas, the latter being directly under a large window, which could make it very hot under direct sunlight. The upper deck is a covered sundeck with the stern part open to the elements; here there is room for 4 to 5 persons to lay if they wish to enjoy the sunshine. Sun mats are supplied in this area of the boat. The main steering position can also be found here and is far forward on the deck. Around the shaded sundeck are bench seats, with similar cushion to that on the rear sun deck. On the main deck there is access to the forward section of the boat and if you are so inclined, you can do your impersonation of Kate Winslet in Titanic and have someone take the photograph.
Included on both boats is bottled water and soft drinks. Tea and Coffee are also supplied. These are available on a help yourself basis.
Although they had facilities to refill the bottles on both boats, there was an ample supply to immediately change your used ones, so that you were ready for the next dive. If, like me, you like to breath and need plenty of air, you can opt for the 15 litre bottles that need to be pre-booked. Sadly there is a $5 surcharge for this, but in an emergency who is counting the cost and it does give the bonus option for extra long bottom times, especially if your buddy is an air miser and always comes back with half a tank, then complains about cutting the dive short due to your air consumption.
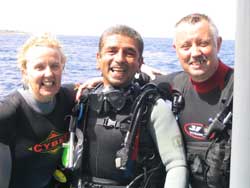
Our lead dive guide Amr with Mary & Tony Hartigan after a dive
Before each dive, our main dive guide, Amr, gave a concise brief of the site and what conditions we could expect, giving different options if these were not exactly as predicted. All the briefs were backed up with a colour drawing of the site, showing the main current direction and preferred routes to get the maximum enjoyment from the area. I’m pleased to say that he got this right nearly all the time.
Overall I was very happy with the service and diving that was supplied by Dive Africa. They were very amenable to our needs and made reasonable suggestions when tackled about anything. The shop staff were very helpful and nothing was too difficult when asked. Both Nikki and Marco (Shop manager) were able to alleviate any of our queries to our joint understanding. Some of us hired equipment from the shop and were able to swop items until happy with the configuration and operation. We were also very happy with its performance underwater
When I return to this resort I will have no hesitation in diving with them again and can highly recommend them to others.
And Finally – A bit about our last days diving – The Thistlegorm (27° 49’ 03″ N, 33° 55’ 14″E.) Northeast of Shag Rock, Sha’ab Ali
The Thistlegorm was built by Joseph Thompson & Sons of Sunderland and launched in June 1940. She was 126.5m in length and displaced 4,898 gross tonnes. Powered by a triple-expansion, 3-cylinder steam engine that generated a very comfortable 365 nominal horsepower. She was one of a number of “Thistle” ships owned and operated by the Albyn Line. With her construction being part funded by the British Government, however, she was destined for “War” duties from the moment she was launched.
Despite being designated as an “Armed Freighter” with an additional armoured Gun Deck built over the aft section, an overall shortage of weapons for the merchant navy meant that only an old 4•7″ gun and a heavy calibre machine gun – both of WW1 vintage, were all that could be spared for the protection of the Thistlegorm and her crew. Her maiden voyage was to the USA and her second voyage was to South America. It was during the second trip that the Captain decided on some mid-ocean gunnery practise. The traversing mechanism of the 4•7″ gun was badly worn and had been replaced with a manual mechanism that meant a second person had to push the barrel around by hand as it was being fired! – Not a task for the faint heart. After the first shot, the second round jammed in the breech. Now misfires are always dangerous – because, as an attempt had been made to fire the round, it could, therefore, explode at any time. A long rope was tied to the firing mechanism and led away to a shelter behind the aft mast house. The resultant flash engulfed the entire stern of the ship – with the projectile managing a whole 50m before dropping into the sea. Thus ended any more gunnery practise. The Thistlegorm returned to the Clyde where she was laid up for two months for repairs to her boilers before being assigned her final cargo.
In May 1941, the Thistlegorm was in her homeport of Glasgow being loaded with supplies essential for the 8th Army and the relief of Tobruk. Though described on the manifest as “MT” (Motor Transport), this – probably deliberate, non-description hid a wide array of Land Mines, Shells, Ammunition, Weapons, Bedford Trucks, Armoured Cars, Bren-Carriers, BSA Motorcycles, Trailers, Vehicle spares, Aircraft and Aircraft parts, Radios, Rubber thigh-boots – and a great deal more besides. The Motorcycles were placed three at a time onto the back of the Bedford trucks to save cargo space before being loaded. The Albyn Line also took the opportunity to deliver two sets of rolling stock to Egyptian Railways – each comprising a 0-6-0 Railway Engine, one Tender and one Water Carrier – all six items being lashed on the decks.
On 2nd June 1941 Captain Ellis ordered the mooring lines slipped before easing his ship out of Glasgow and made good time to her secret rendezvous off the south coast of England, where she joined a large convoy and, being armed, was assigned a prominent position by the Convoy Commodore. Due to the Axis Forces occupying almost the entire northern Mediterranean coastline, the safest route to Alexandria was via South Africa. After refuelling in Capetown, the Convoy then proceeded up the east coast of Africa before finally entering the Red Sea. By the time they arrived at the entrance to the Gulf of Suez it was the third week in September and the Thistlegorm was immediately assigned “Safe Anchorage F” to await further instructions. The Master let out the starboard anchor and some 250m of chain and was satisfied that all was well. This was “good holding ground” and, at long last, the main engines were closed down, all they had to do now was wait for clearance to proceed through the Suez Canal to Alexandria.
Getting through the Canal depended on several factors, the activity of enemy aircraft over the Canal, cargo priority and how long your ship had been waiting. To complicate matters however, two vessels had collided further up the Gulf and were virtually blocking the entire entrance to the Canal. This led to the Thistlegorm and her valuable cargo remaining at anchor for a full two weeks. The “Safe Anchorages” were regarded as exactly that, Safe! There were no enemy ships or aircraft venturing this far south, however, all this was about to change.
German Intelligence had received information of a large troopship (possibly the Queen Mary) due to travel through the Suez Canal with 1200 British Troops destined for North Africa. Now No 2 Group, 26th Kampf Squadron who had just mastered the relatively new skill of night flying and based in Crete were alerted to the possible presence of such a large vessel. Their task was to seek and destroy. At 2250 hours on 5th October 1941 two twin-engine Heinkels He111’s crossed the north Egyptian coast heading southeast in search of this elusive prize.
On a clear moonlit night, they searched in vain for sight of the big ship until their fuel levels became critical. Then, just as they were on the point of returning home, one of the pilots spotted a ship at anchor. Turning in order to put his aircraft in the best possible attacking position, the pilot continued to lose altitude. He came in low over the sea and, as he approached the bows of the Thistlegorm, he released two bombs right over her bridge. Both bombs penetrated No 5 hold – aft of the bridge, detonating a great deal of ammunition that had been loaded there. The two locomotives, being carried as deck cargo, were sent the spiralling into the air from the resultant explosion as the ship was ripped open. The vessel immediately began to sink and the crew quickly abandoned ship most of them leapt straight into the sea, due to lack of time to launch the lifeboats. Caught unawares, the Thistlegorm had been given no time to defend herself and she quickly sank, it was 0130 on the 6th October 1941. Captain Ellis and the other survivors were rescued and taken to Suez where he reported four members of his crew of 39 and five of the 9 Royal Navy ratings had all lost their lives.
For many years, British vessels passing the site where the Thistlegorm was lost would dip their flags as a mark of respect for those who died. The ship itself remained undisturbed until the early fifties when Jacques Cousteau discovered her. He raised several items from the wreck – including one of the motorcycles, the Captain’s safe and the ship’s bell but, however, did not reveal the ship’s position and, once again, the Thistlegorm passed into history.
All that changed in the early nineties when a group of divers happened upon her by chance. Little did they know that they had re-discovered what was to become one of the greatest diveable shipwrecks of all time.
The SS Thistlegorm sits at the forefront of all others shipwrecks. Such is the pulling power of this single vessel that she attracts more divers than any other underwater site anywhere else in the entire world! Since being re-discovered in the early nineties, the Thistlegorm has consistently remained “The World’s Foremost Diving Attraction”, what makes this ship so extra-special is the combination of several factors. Despite the manner of her sinking, the extensive damage aft of the Bridge and the ongoing destruction, the Thistlegorm is still in remarkable condition. The front and main section remains largely intact and sits upright on an even keel on a sandy seabed at a maximum depth of 32 metres. The starboard anchor is deployed and its heavy anchor chain can be seen disappearing over the bows into the gloom, some railings are still in place and all the winch houses, winches, blocks, windlasses and other paraphernalia are there to be found. Then there is the story of her passing, with all its ingredients of War, Heroism and Tragedy stories. Prevailing conditions and accessibility to the wreck all come into play. These include an acceptable climate, warm waters, excellent underwater visibility and a maximum depth of 32 metres to the seabed. Within the Thistlegorm, the cargo is a veritable underwater “World War II Museum.” what more could be asked of any shipwreck.
Our day had arrived and we were all looking forward to visiting this wreck, some for the first time, others looking forward to rekindling fond memories of the wreck. Our 3.30am start saw us in good spirits waiting for the dive shuttle to pick us up. On the way to the port we picked up a couple of other divers that had dived with our group on the Saturday. On arrival it was all aboard the Dive Boat “King Snefro 4”, a liveaboard boat that we would be using for the day, and a quick look for a place to set your head and catch a few hours of shuteye as the boat made it way to the wreck site. Some took the time to look skywards at the stars, a sight not polluted by radiated light as in the UK, and a game of “spot the Satellite”.
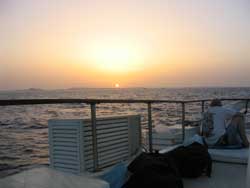
Sun rise over the south Sinai Peninsula, Egypt from the dive boat “King Snefro 4”
Four hours later after a spectacular sunrise we arrived at the site of the last resting place of the SS Thistlegorm.
As the dive boat was positioned above the Thistlegorm, once our guide Pavel was thefirstpersoninto the water, towing behind him a stout rope all the way down to the wreck and securing it onthe port side near what was No 5 hold, just aft of the bridge,the site of the explosion that sent the ship to her watery grave. He then surfaced and repeated this, tying off another line to one of the buffers on the train tenders close to the bows of the ship. Once we were secure, the engines were switched off and in we went in two groups. The first group in using the rear shot line, the second descending to the front of the wreck. I was in the first group to hit the water, there was no stopping and we followed the rope downwards, slowly the wreck came into view in all its splendour. Those on their first dive stared in awe for a moment, before continuing lower to the wreck and the most extensively damaged area before encountering that decking which was “peeled” back by the explosion causing it to reach almost to the bridge. Emerging into sight is the devastation that surrounded the sinking, ammunition boxes form a large pile of fairly uniform debris, on top of this sits an up-turned tracked Bren Carrier. Pointing towards the stern is the broken drive shaft and some 20m further on is the remainder sticking out of what remains of the stern. Below are a number of very large shells – possibly 14inch, once destined for a British Capital Ship. Boxes of what appears to be mortar shells can easily be recognised with their distinctive shaped fins.
The stern itself is canted over at an angle of 45 degrees and is as interesting as any other part of the ship. The two deck-mounted guns are still in place and are best viewed from below where they make excellent silhouettes against the distant surface. If you take the time to look, you will see the handles are polished bright by the many hands that have caressed their surface. Further on the rudder and single screw can be found, look again at the outer edges of the upper most blade of the screw and see that it shines just as bright due to the number of divers that had rubbed their hands along its surface. Once around the stern and back over the open area of No 5 hold it was time for a quick look at the mid-ship section and the bridge area. Here we were able to do our first penetration of the wreck and what may have been the captains cabin. A large bath, now filled with slit instead of bath water can be seen along with some of the pipe work that would have supplied the hot and cold water. Sadly anything of value has long been stripped away long ago by other divers searching for that elusive souvenir or wretched trophy, but it is still worth a visit here.
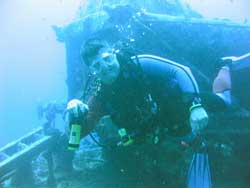
Harry in front of the Starboard side 0-6-0 tender
Once through this superstructure we find ourselves above No 2 hold at deck level, two Railway Tenders, one on each side of the hold, can be seen here, sitting as they were first placed all those years ago, beside which are two “torpedo” shaped Paravanes, (a device equipped with sharp teeth that is towed alongside a ship to cut the mooring cables of submerged mines) We slowly made our way around these, examining them carefully before fining down the port side of the wreck to the top of No 1 hold, before we could go any further a quick check showed that our down time was quickly coming to an end and it was back on ourselves, this time keeping to the open deck level, to the down line above No 5 hold. Here we spotted a large crocodile fish, out in the open right below where the line was tied off. How did we miss it on the decent? I wonder. A slow ascent, negotiating other lines that now crossed ours, up to our safety stop and a 5-minute wait before we can reach the surface. Looking back down you can see divers scrambling around the wreck and a mirada of bubbles expanding on their way towards the light. Suspended around us was a mass of small Jelly Fish, looking like discarded transparent tubes that you could wave away with a sweep of your hand. One by one we quit the shot-line and fin towards the back of the boat and the ladder that will take us away from the world of water and all the secrets that it holds. Once back onboard it is the race to see who can tell the best story of the dive and out-do everyone else with the descriptions of what they saw.
We thought that we would have our lunch during our surface interval, but due to increasing high winds, the captain decided that we should do our second dive as soon as possible. So just after 1 hour we were hitting the water for the second dive, thankfully everyone was using a dive computer and were told to check for decompression times throughout their dive.
Back down the rear shot line until we came to the first of the crossing lines, which could be seen to be secured above No 2 hold, which beckoned us with its promise of unseen delights. Suddenly three WW2 vehicles can be seen on the starboard side of No 2 Hold, we drop deeper and go into the main hold itself, swimming right into the hold, over the tops of many more vehicles, still parked as though they are still waiting to be unloaded. Behind each cab, can be found the three motorcycles where they had been stowed to save cargo space for the sea passage. With the power of our dive torches we were able to illuminating this incredible scene and it suddenly became all too obvious why I had also read so many “downbeat” articles about this single shipwreck.
The motorcycles have been pushed over, only divers could have done this while searching for something to remove and keep. The badges, pedals, twist-grips and tool kits are all gone. Within the lorries and trucks, only a few steering wheels are left. Worse still, in order to get at those steering wheels or perhaps a souvenir from the engine, divers have smashed their way in through the roof or bonnet of each vehicle – thus maximising the damage caused in search of their wretched trophy. The sad thing about this is that the majority of these trophies find a new resting place in some private dark and dusty place never to be enjoyed by others. Perhaps the writers who have even published photographs of these stolen items have an answer to why… the SS Thistlegorm is an unofficial War Grave and whilst the Ministry of Defence would never seek to prevent divers from visiting the ship and never have, they do regard all items taken from her simply as “theft!”
The starboard side of No 2 hold, however, is where an incredible journey begins. Swimming gently above the vehicles, there is plenty of room to explore and inspect the various Lorries, Trailers, Motorcycles and other items as you journey below the bridge. Access to the inside No 1 hold can be found and the cargo of parts and spares can be explored. These have come to look like an accumulation of debris, which obscures anything of greater interest – including more vehicles. Even though, time spent here is not a waste. Leaving the foc’sle, on the main deck there is a railway water carrier on either side of No 1 hold with the one on the port side resting precariously over the edge of the hold. Back at deck level and the bows can be seen looking, just as it might have looked on that fatal night. The heavy starboard anchor chain seen snaking over the deck and through the side of the ship towards its anchor still dug deep into the seabed somewhere ahead in the gloom. A dive boat has tied off to one of its massive links and a hammering sound as it hits the deck repeatable can be heard every time that boat is lifted and dropped by the wave action above. This goes to show that the diving boats themselves cause the greatest damage of all to this majestic wreck.
Anything up to 20 boats might be moored over the wreck site at any one time. The first to arrive generally tie up to the shallower reaches of the wreck such as the bridge, (the shallower the better for the dive guide who has to retrieve the mooring line at the end of the day.) then, when there is no more space, the boats tie to each other. With the larger boats weighing several tons, it is easy to see how the combined force of such a small fleet, all pulling together as they take a single wave, are able to exert pressures that no ship’s superstructure was ever designed to withstand. Over one year it was noticed how the bridge section was even shorter than the year before, with a large portion of it now residing on the seabed. It remains the supreme irony that the world’s foremost scuba diving attraction is literally being pulled apart by the very diving boats that are dependent on her for their livelihood!
Around the bows some railings are still in place and all the winch houses, winches, blocks, windlasses and other paraphenalia can also be found here. Going as far forward as you can, you arrive at the front of the bows and can look down to the grand lines of the front of the ship. Hovering there brought memories to mind of the scene from Titanic and Kate Winslet standing with her arms held out as if flying across the water. From here you can also see the anchor chain dropping at an angle away and forward from the wreck. I wonder what the anchor would look like buried in the death grip of the sand after all these year. Moving back towards mid-ships we come across large Lionfish sheltering around the windlasses, waiting to pounce on unsuspecting prey. They show no concern as we creep loser to get a better view or to snap a couple of photos. We drift across the No1 and No 2 holds towards the port side of the wreck and see the beams of diver torches sweeping around like searchlight of days gone by. The other Railway Tenders and “torpedo” shaped Paravanes stand proud over shadowing that side of No 2 hold.
I wonder how much longer they will be left to stand here as, like our dive boat, they are commonly used as mooring point. A large Stonefish is hiding under here, perhaps it is also waiting for its next meal and it watches us as we pass it by. Anenomies, with their resident clownfish (yes; we all go to see Nemo), Deadmans Fingers, Plumrose Anenomies, and a variety of marine life have made their home on this wreck, each adding colour to what would otherwise be a drab scence. Along the starboard side and back to the bridge, we followed the path of countless feet that must have trodden these decks when the ship sailed the high seas. A door appears and we enter the dark for the last time, our eyes slowly accustom themselves and with the aid of our torches we do a slow sweep of the area. Bright spots can be seen, where the eyes of fish reflect its light and vague shapes slowly take form as we approach. Looking up, a mirror surface can be seen shimmering in the beam, where the air bubbles from countless divers have merged to form an airspace that slowly leaks from cracks and holes in the roof in a never ending stream towards the surface high above.
As in all dives, time and air are soon expended and we must make our way back towards our down line for the trip back to the surface. But remember things can appear when least expected, as being the last to leave the wreck we were treated to a wonderful sight of a monster of a Moray Eel free swimming along the starboard side of the wreck. As it came directly below Julie and myself, we tried desperately to draw the attention of our other dive buddies who were making their way toward their safety stop on the line. Sadly only Arm, our dive guide, turned to look and was rewarded with the sight of this denizen of the deep as it slowly turned and rose towards us and the deck above. Thoughts of Jacqueline Bisset and Nick Nolte in “The Deep” rushed into my mind; thankfully my nemesis entered the wreck, just below where we were waiting, ready to frighten some poor unsuspecting diver who may penetrate that part of the wreck.
This was a fitting end to what was two cracking dives on this jewel of the Red Sea and confirmed that this was one of the greatest diveable shipwrecks of the world. Time to ascend and hang in the water as our excess nitrogen is off gassed, then back to the boat and the return leg back to Sharm.
Our two dive guides Pavel and Amr.
Once Pavel had retrieved the mooring lines, it was time for lunch and everyone had tales to tell. Mine was one of the best when I recounted my sighting of the Moray, thankfully Arm had seen it or they would have though it just another fisherman’s story; size does matter. Once everyone has slated their hunger, it was time to retire to the upper decks, some to enjoy the somewhat breezy sunshine, others to catch up on missed sleep but everyone to dream of the next trip back to this site. 4 Hours later we were back on land and had the rest of the holiday to look forward to and plenty of time to recount our adventures
I would like to thank my fellow travellers for making this expedition a roaring success. I would also like to thank Dive Africa and especially our dive guides Amr and Pavel who made the diving so enjoyable.

The Wife and I – shes the pretty one on the left
I hope you have enjoyed both Part one and Part Two of my experiences on this latest trip. If you were part of our group, then please submit your own article about your thoughts and get them published on the web.
Copyright © 2008 Bristol Aerospace Sub-Aqua Club


